Looking for an accurate ESP32 decibel sensor solution to measure sound level indoors and outdoors? The PCB Artists decibel sensor sits in perfectly with other I2C environment sensors and helps you measure sound levels just like a handheld digital decibel meter. Consuming only 5mA at 3.3V, the decibel meter module is the most optimal choice for measuring sound levels with an ESP32.
This example project outlines how to build an accurate IoT decibel meter with
- Arduino project and sketch
- +/- 2dB SPL accuracy
- Ultra low-power, only 5mA @ 3.3V with ESP32 in sleep mode
- Connectivity to ThingsBoard cloud dashboard
- Understanding Sound Level Sensing: Basics of Decibel Measurement
- Measuring Decibels with ESP32 - Notes
- Notes on the PCB Artists Decibel Sensor
- Connecting Decibel Sensor and ESP32
- Setting up the ThingsBoard Dashboard
- Testing the ThingsBoard Dashboard
- Arduino Sketch for Decibel Meter
- Results - Indoor Decibel Readings, Quiet Household
- Tips for Making a Low Power ESP32 Decibel Logger
- Decibel Meter with ESP32 + OLED Display + Ubidots
- Frequently Asked Questions (FAQs)
- Change Log
Understanding Sound Level Sensing: Basics of Decibel Measurement
Measuring sound level in decibels is not as easy as simply getting a signal from a sensor and then extracting sound level values based on the sound samples.
There are countless projects on the internet that use a microphone module with an analog output. The analog output of such modules is simply the envelope of the audio signal output by the microphone and amplified by an op-amp on board. A setup like that cannot be used for good quality sound level measurements.
Loudness of sounds varies with frequency based on human perception
For measuring sound in dB SPL with A-weighting – like all handheld meters do – you need to perform a complex set of operations on the input audio to get a decibel value. Here is how a correctly implemented sound level meter works:
- Capture audio from the microphone and buffer several milliseconds of the audio in raw/uncompressed format
- Prepare the data by fetching a frame and converting the sound signals to frequency domain values with FFT routines
- Compensate for the frequency response of the microphone (a mic will usually respond non-uniformly to different tones)
- Apply weights to the different frequency bands as necessary
- Calculate the total energy and convert to decibel (dB SPL)
- Perform a moving average to smooth out decibel values over a specified time window
If you miss out on any of the above steps, you end up getting sub-optimal decibel values. Even if you calibrate a poorly designed system against a source, the sensor will only work at that calibration frequency and start deviating when different types of noises are applied.
Measuring Decibels with ESP32 - Notes
Can the ESP32 process sound from a microphone all by itself and produce an accurate decibel value? Yes it can!
When should you use ESP32 for decibel measurement?
That depends on your particular use case.
- If you are not running any other time sensitive code and can allow one of the ESP32 cores to capture the audio and perform all the math required to calculate decibels values, then you can.
- If you can spare at least 3 GPIOs for I2S interface. Using an analog input for sound measurement is not an option because ESP32 internal ADC has very low resolution. You need a 24-bit ADC to measure audio with wide dynamic range.
- When you can afford to burn hundreds of mA’s constantly.
- You will develop the firmware and also need to maintain the decibel measurement code through ESP-IDF updates, which can be a big task in itself.
If power consumption matters in your project, using an external dedicated module like ours is the most practical solution.
When should you use a dedicated decibel measurement module?
- If low power consumption matters, a dedicated decibel measurement module will always perform better.
- An I2C sound level module like ours offers easy scalability. You can hook up several modules to one ESP32 without worrying about overloading the ESP32.
- Modules are already matched and calibrated, you can simply plug-and-play.
- Ability of the module to record up to 100 recent decibel values and wake up the ESP32 periodically allows much better system power management.
- Lastly, a module removes the headache of developing and managing your own decibel measurement code.
Notes on the PCB Artists Decibel Sensor
Sound measurement is a very common requirement in many different domains, be it industrial applications, traffic management or home monitoring projects.
Given the popularity of audio level measurement applications and IoT projects, we decided to figure out an easy and simple method to add hand-held sound meter like accuracy to audio level measurement embedded and IoT projects.
You cannot think about IoT projects without thinking about the ESP32, so of course, we have an example here to help you get started with the decibel meter and ESP32.
Here is a short list of what you can do with the decibel meter and ESP32:
- Measure sound levels with an accuracy of +/- 2 dB SPL
- Measure and record decibel values even with ESP32 in deep sleep
- Sound level triggers to wake up the ESP32 using INT pin
- Supports A-weighted and C-weighted level measurements.
- Adjustable averaging time period, up to 10 seconds
- 32-bit Unique ID
- Stick-on module available for easy mounting to enclosures
Connecting Decibel Sensor and ESP32
The decibel sensor module is powered with 3.3V and can be connected to the same power source as the ESP32 module. Most ESP32 devkits or boards will contain a 3.3V regulator on board that powers the ESP32. You can power the decibel meter using the 3.3V output.
The I2C pins of the decibel sensor are open-drain. The host MCU or PCB needs to provide I2C pull-ups on the SCL and SDA lines to make the communication interface work.
In this case, we can simply use the ESP32 GPIO internal pull-ups.
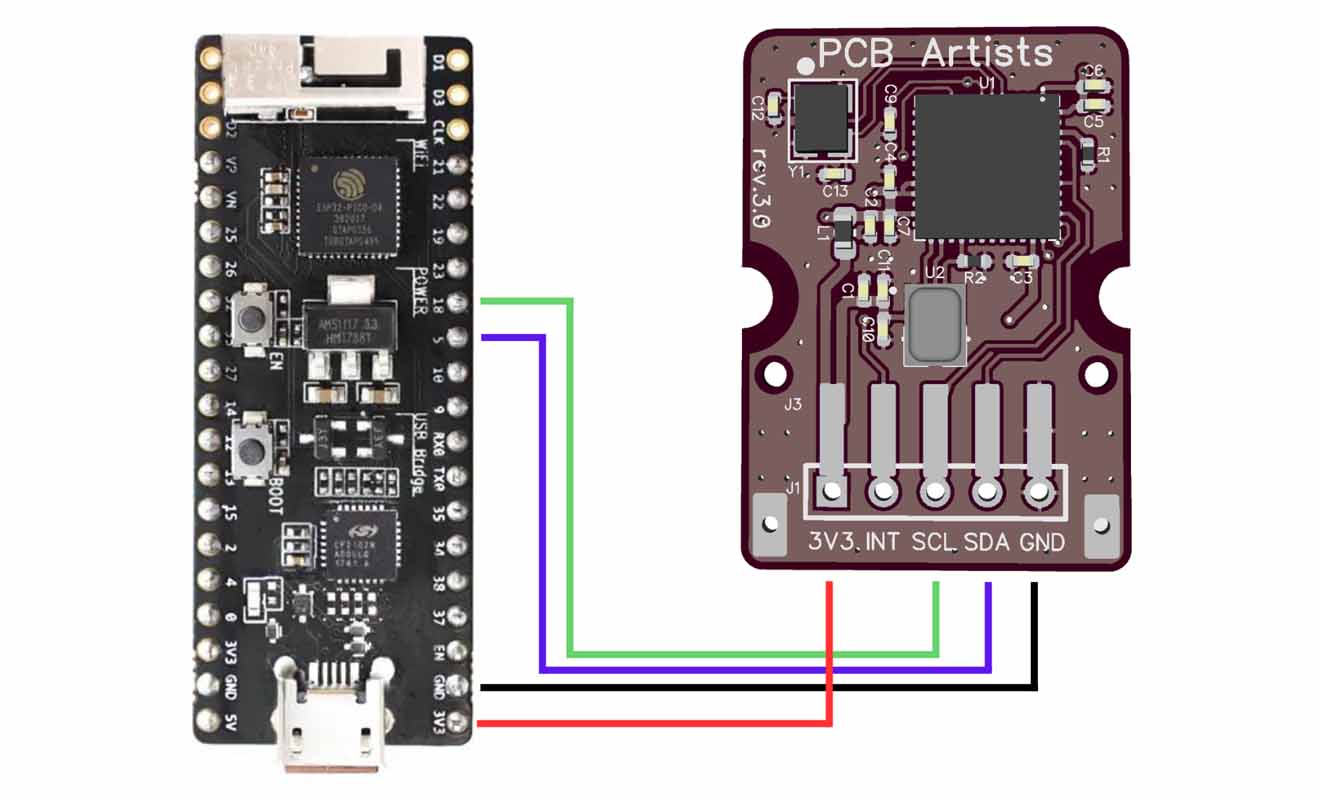
Putting together the ESP32 decibel meter assembly is easy. Only four connections are required to be made, and the INT pin is optional. Note that INT pin is open-drain too and goes low when INT is active.
- 3.3V of the module should be connected to 3.3V output of ESP32 board
- SCL of the module is connected to GPIO 18 of ESP32
- SDA of the module is connected to GPIO 5 of the ESP32
- GND of the module should be connected to the GND of ESP32 board
You can connect the module SCL and SDA pins to other output-capable pins of the ESP32. Just make sure that your code selects the right GPIOs.
Setting up the ThingsBoard Dashboard
ThingsBoard.io is a great solution to quickly deploy and test simple IoT devices. You can use ThingsBoard for production and real world deployments just as easily. EVen if not, it makes a GREAT solution for validating and demonstrating your projects and ideas. On top of all that, it is free and very well-documented!
- You can start by creating a free account on ThingsBoard.
- After your account is all set up, start by making a simple device.
Open Entities > Devices from the left sidebar, and create a new device. I set the name and label to ESP32 dBMeter. The Device profile field was set to “default”.
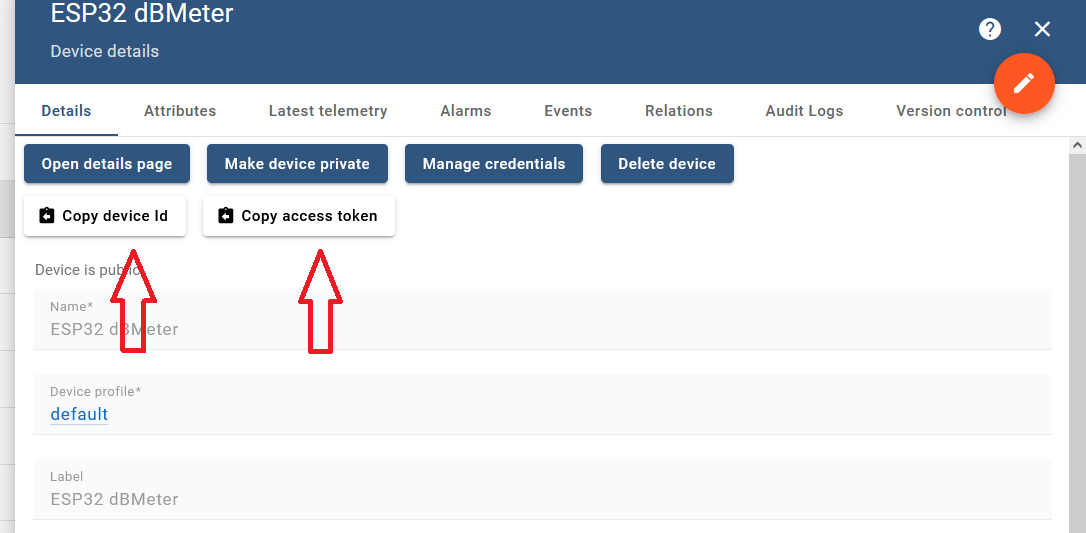
- Copy the device ID and access token for future use. These credentials are needed to let the device post data to ThingsBoard.
If you use incorrect credentials, ThingsBoard will reject the data you send from your ESP32. These details are set in the Arduino sketch later. - In the “latest telemetry” tab, you can see the latest data frame that ThingsBoard received from your decibel meter. Useful for debugging after the device starts streaming values.
- Now that your device is created, start by making a simple dashboard. On the left sidebar, head over to Dashboards and click the “+” icon to create a new one. I named it “PCB Artists Decibel Meter”. Save it.
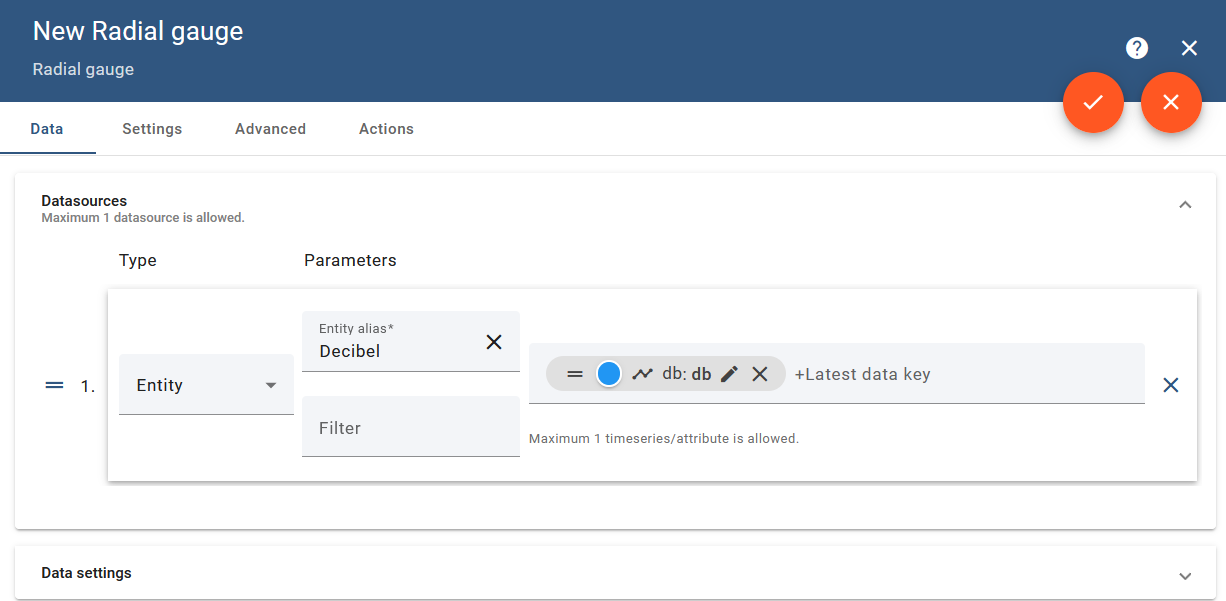
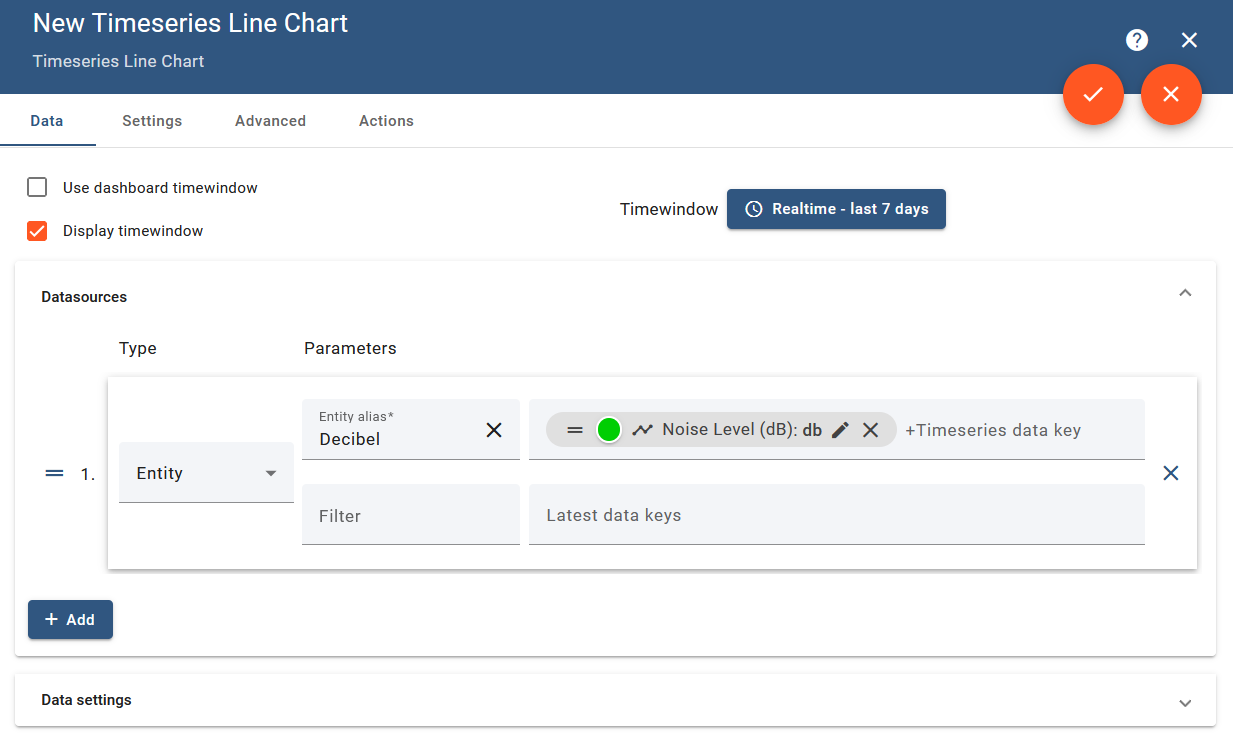
- Edit this dashboard and add 2 widgets:
– A radial gauge
– A timeseries chart
The settings for these widgets are shown below.
Don’t remember to create and add “db” data key to both widgets so the widgets can track db values posted as JSON strings from the ESP32.
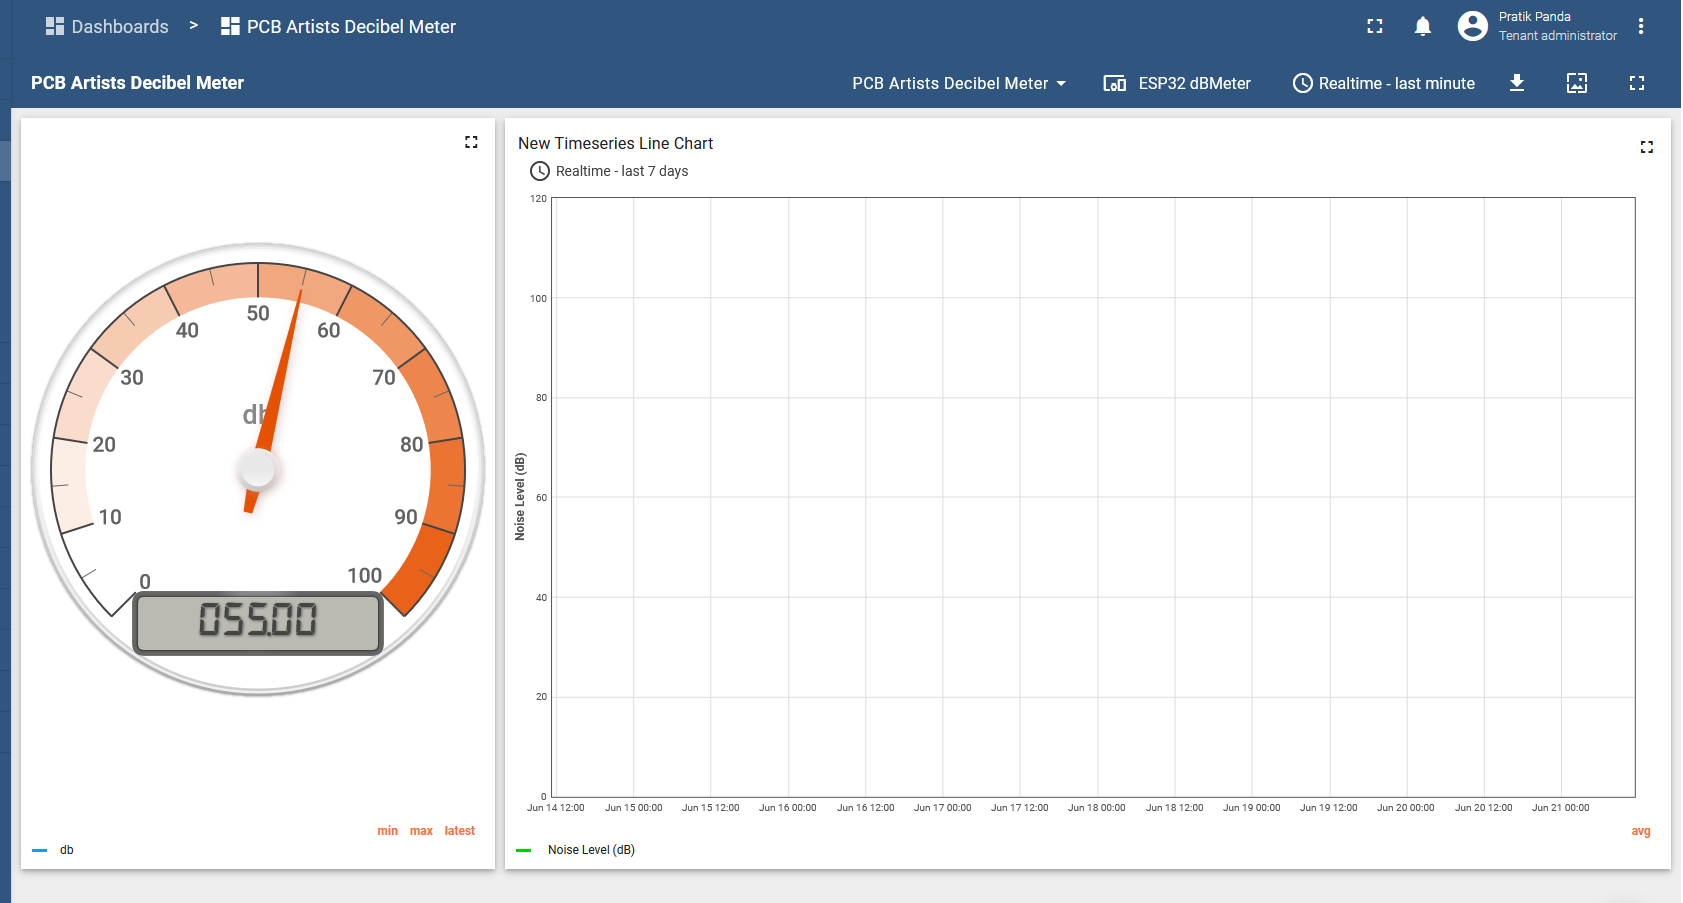
The dashboard can be made to look something like this after you are done with the above steps.
You can download our dashboard here for reference.
Testing the ThingsBoard Dashboard
You can test the ThingsBoard dashboard by simply making POST requests as outlined in section 3 of this air quality monitor tutorial.
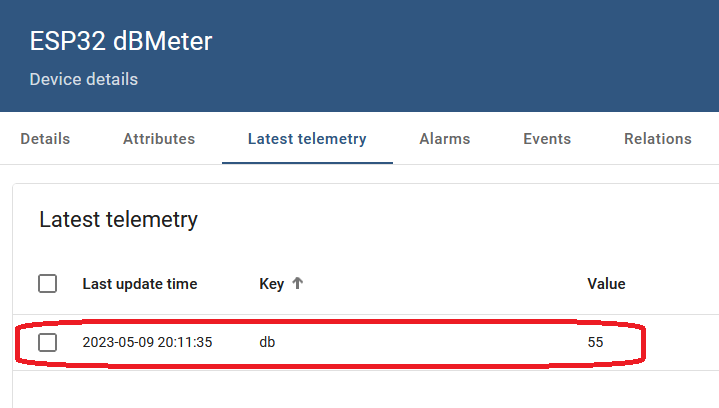
If everything is good, you should be able to see the latest decibel value by opening Entities > Devices and looking in the Telemetry tab.
Arduino Sketch for Decibel Meter
Now that the ThingsBoard dashboard is set up and you have confirmed that data is getting through to your dashboard, it is time to set up the hardware to send some real sound level readings to the dashboard.
Below is a simple Arduino sketch that sets up the ESP32 as a Wi-Fi station device and uploads data to the ThingsBoard server.
A few parameters need to be defined to make the decibel sensor work properly on your end:
- I2C SDA and SCL definitions need to be updated to match your hardware arrangement. I connected SCL and SDA to ESP32 GPIO 18 and GPIO 5, respectively.
- Decibel meter I2C address needs to be updated if you ordered a customized module
- Wi-Fi SSID and password need to be updated, see line 49 of sketch below
- ThingsBoard API key needs to be changed in line 97 of the sketch (marked by ########)
- Delay between decibel measurements can be changed in line 122 of the sketch
The sketch for the ESP32 decibel meter is very simple and easy to follow.
A TwoWire object called dbmeter is defined to communicate over I2C with the decibel meter.
The dbmeter_readreg() function is used to read a register from the PCB Artists decibel sensor module.
The sketch connects to the Wi-Fi network after powering up and if a connection is established, it connects to the ThingsBoard server and sends a POST request containing the latest decibel value.
The settings for reading decibel value is left at the module default setting of 1,000 ms slow mode averaging time with A-weighted readings. This works in almost all indoor and outdoor environments where general audio noise levels need to be monitored.
If you need to change the decibel measurement settings, you can refer to the decibel meter I2C register description for more information.
#include <WiFi.h>
#include <HTTPClient.h>
#include <Wire.h>

// SDA and SCL pins for the decibel meter module
#define I2C_SDA                 5
#define I2C_SCL                 18

// I2C address for the module
#define DBM_ADDR                0x48

// Device registers
#define   DBM_REG_VERSION       0x00
#define   DBM_REG_ID3           0x01
#define   DBM_REG_ID2           0x02
#define   DBM_REG_ID1           0x03
#define   DBM_REG_ID0           0x04
#define   DBM_REG_SCRATCH       0x05
#define   DBM_REG_CONTROL       0x06
#define   DBM_REG_TAVG_HIGH     0x07
#define   DBM_REG_TAVG_LOW      0x08
#define   DBM_REG_RESET         0x09
#define   DBM_REG_DECIBEL       0x0A
#define   DBM_REG_MIN           0x0B
#define   DBM_REG_MAX           0x0C
#define   DBM_REG_THR_MIN       0x0D
#define   DBM_REG_THR_MAX       0x0E
#define   DBM_REG_HISTORY_0     0x14
#define   DBM_REG_HISTORY_99    0x77

TwoWire dbmeter = TwoWire(0);

// Function to read a register from decibel meter
uint8_t dbmeter_readreg (TwoWire *dev, uint8_t regaddr)
{
  dev->beginTransmission (DBM_ADDR);
  dev->write (regaddr);
  dev->endTransmission();
  dev->requestFrom (DBM_ADDR, 1);
  delay (10);
  return dev->read();
}

void setup() {
  Serial.begin (115200);

  // Wait and set up Wi-Fi connection
  delay (6000);
  WiFi.begin ("Airtel", "wifipassword");

  while (WiFi.status() != WL_CONNECTED)
  {
    delay (5000);
    Serial.println ("Connecting to WiFi network 'Airtel'...");
  }
  Serial.println ("Connected!");
}

void loop() {
  // Initialize I2C at 10kHz
  dbmeter.begin (I2C_SDA, I2C_SCL, 10000);

  // Read version register
  uint8_t version = dbmeter_readreg (&dbmeter, DBM_REG_VERSION);
  Serial.printf ("Version = 0x%02X\r\n", version);

  // Read ID registers
  uint8_t id[4];
  id[0] = dbmeter_readreg (&dbmeter, DBM_REG_ID3);
  id[1] = dbmeter_readreg (&dbmeter, DBM_REG_ID2);
  id[2] = dbmeter_readreg (&dbmeter, DBM_REG_ID1);
  id[3] = dbmeter_readreg (&dbmeter, DBM_REG_ID0);
  Serial.printf ("Unique ID = %02X %02X %02X %02X\r\n", id[3], id[2], id[1], id[0]);

  uint8_t db, dbmin, dbmax;
  String DBMjson;
  while (1)
  {
    // Read decibel, min and max
    db = dbmeter_readreg (&dbmeter, DBM_REG_DECIBEL);
    if (db == 255)
      continue;
    dbmin = dbmeter_readreg (&dbmeter, DBM_REG_MIN);
    dbmax = dbmeter_readreg (&dbmeter, DBM_REG_MAX);
    Serial.printf ("dB reading = %03d \t [MIN: %03d \tMAX: %03d] \r\n", db, dbmin, dbmax);

    // Assemble JSON with dB SPL reading
    DBMjson = "{\"db\": " + String(db) + "}";
    Serial.println ("JSON: \n" + DBMjson);

    // Make a POST request with the data
    if ((WiFi.status() == WL_CONNECTED))
    {
      //Check the current connection status
      HTTPClient http;

      http.begin("https://demo.thingsboard.io/api/v1/########/telemetry");
      http.addHeader("Content-Type", "application/json");
      int httpResponseCode = http.POST(DBMjson);   //Send the actual POST request

      if(httpResponseCode>0)
      {
        //Get the response to the request
        String response = http.getString();
        Serial.println(httpResponseCode);   //Print return code
        Serial.println(response);           //Print request answer
      }
      else
      {
        Serial.print("Error on sending POST: ");
        Serial.println(httpResponseCode);
      }

      http.end();  //Free resources
    }
    else
    {
      Serial.println ("Something wrong with WiFi?");
    }

    // Wait for 5 seconds before posting another reading
    delay (5000);
  }
}
Results - Indoor Decibel Readings, Quiet Household
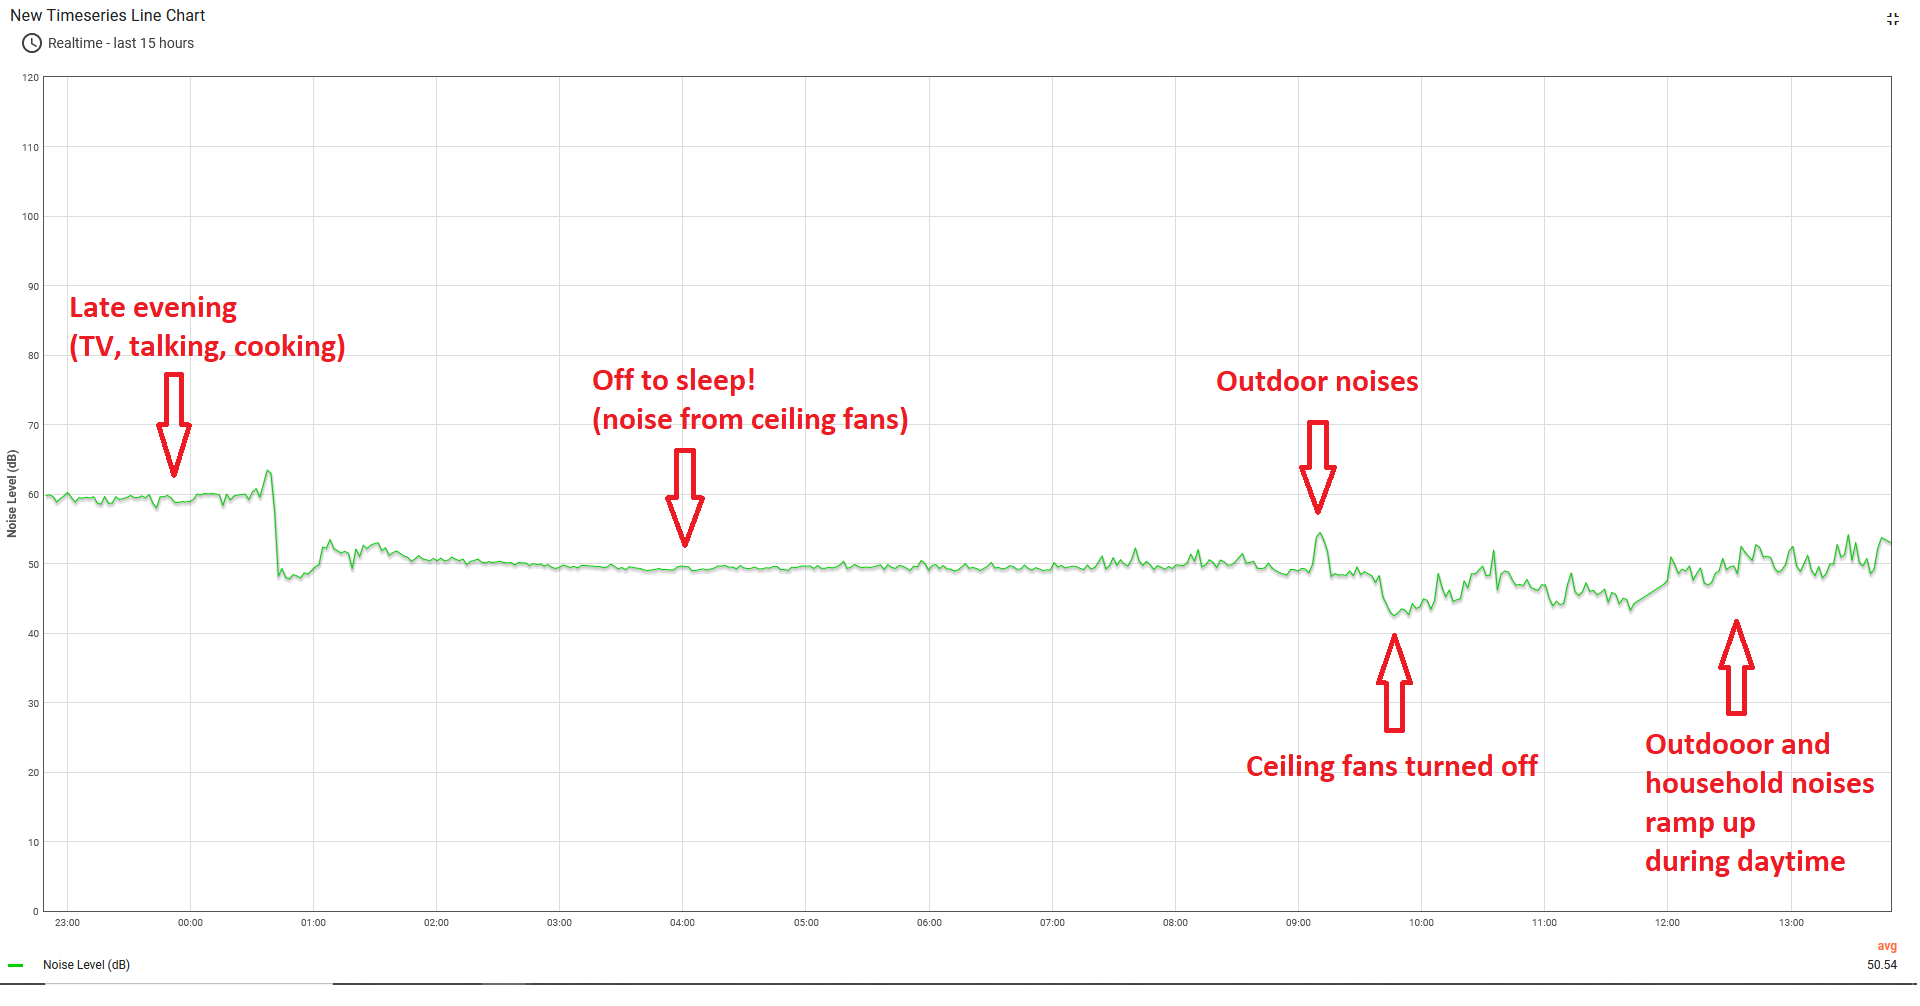
I placed the ESP32 decibel sensor running the above sketch through an evening and night in my study. My place is usually very quiet, being in a rural area away from the noise of a busy city. Here is what I captured.
Not a whole lot going on throughout the night. Activity seems to ramp up during the day when household activities start and outdoor noise increases a little. Placing the setup near a window of a house situated on a busy street will produce much higher fluctuations in noise levels throughout the day.
As the chart below demonstrates, the decibel values read from the ESP32 are highly repeatable and free from random spikes. It can hold a steady reading through durations of low noise and also responds very well to spikes or steps in audio levels.
I am hoping to compare this decibel meter module to a Fluke 945, which is almost 10x more expensive than this decibel sensor module. The results will probably be published as a YouTube video very soon.
Tips for Making a Low Power ESP32 Decibel Logger
It is possible to improve the ESP32 decibel meter project in several ways – especially if you wanted to control power consumption and run the whole thing on a battery.
An ultra-low power, battery powered ESP32 sound level logger can be achieved with the following steps:
- Use the INT pin of the sound level meter to generate an interrupt and wake up the ESP32 when needed.
- ESP32 should go to sleep mode and let the sound level meter sample with Tavg = 1000 ms. The sound meter module will then generate an interrupt when 90 values spaced 1000 ms apart are stored.
This allows the ESP32 to sleep for 90 seconds. - On an INT, the ESP32 can wake up and read the past 90 values from the module and either go back to sleep or upload/process these 90 values.
- When it is not necessary to read decibel values, the module can be put into sleep mode by using a sleep command over I2C. Sleep consumption is less than 200 uA.
Decibel Meter with ESP32 + OLED Display + Ubidots
Want to add a display to your ESP32 devkit to display decibel readings live while also pushing data over the internet?
How2Electronics has a comprehensive video and article on how to set up your ESP32 to do this. You can find their video below, or read the full article on using the decibel sensor with ESP32 and Ubidots for data logging.
Frequently Asked Questions (FAQs)
The decibel sensor has been designed to work within specifications and reject power line noise caused by ESP32. Just make sure the module is not placed close to the ESP32 antenna and use averaging time setting of 1,000 ms or more.
It is recommended to always set the averaging time to 1000 ms (module default) to capture normal indooor/outdoor environments. You can read the value once every minute or fetch minimum/maximum value for the past one minute.
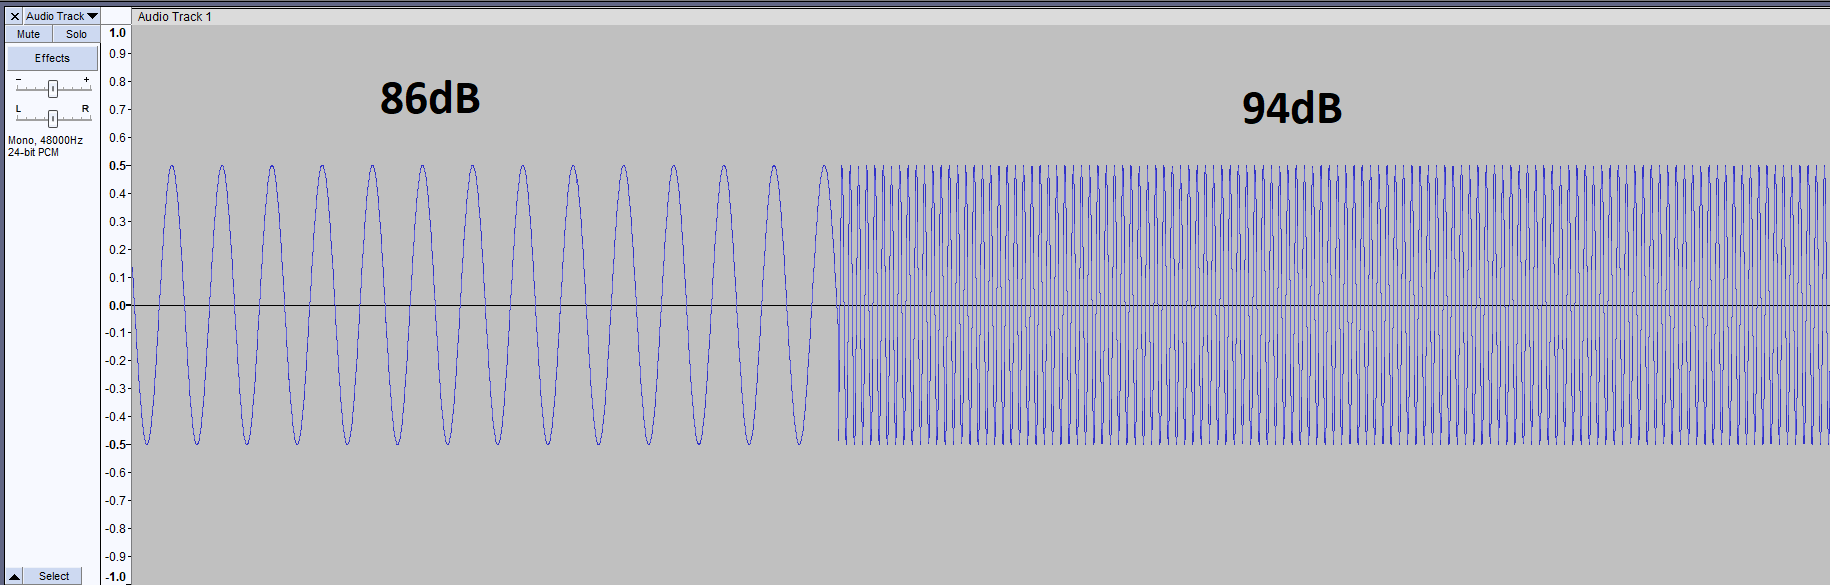
PCB Artists decibel sensor modules are already calibrated and checked against a 94dB 1 kHz sound source. No additional steps are needed from your end for calibration.
On the decibel sensor product page, look for the mechanical mounting guide and make sure you are mounting the module appropriately to avoid vibrations and RF noise affecting the readings.
The decibel sensor contains a scratchpad register. If you feel that the ESP32 is not able to communicate properly, especially at high speeds, use the scratch register to test if read/write operations are working properly.
Feel free to contact us if usual debugging steps do not work.
Change Log
- 21 June 2023
– Initial release - 16 July 2023
– Added section on decibel meter + ESP32 + OLED + Ubidots
2 comments
These days, a better example would be a Raspberry Pi with Python. These are much more in use than Arduinos.
Thank you for the suggestion! There is a Pi Pico and MicroPython example.
We will add some Python code to our Raspberry Pi example soon.