Accurate sound level monitoring is important in several applications, ranging from environment monitoring and industrial noise control to indoor noise monitoring in office spaces and homes. There is no better way to implement an accurate RP2040 or Raspberry Pi Pico sound level sensing solution than what we have outlined in this demo.
To make it easier for sensing audio level in decibel (dB SPL) without performing complex calculations on the RP2040 itself, we have created a simple I2C decibel sensor module that you can easily hook up with the Pi Pico and read out decibel values with A-weighting and time averaging – just like a commercial sound level meter!
Combined with the simplicity of MicroPython, a simple setup with Pi Pico and the decibel sensor is sufficient to make a demo sound meter that is as accurate as class 2 commercial sound level meters.
Pi Pico Sound Level Sensing - Application Ideas
The relatively new Raspberry Pi Pico is extremely popular with hobbyists, students and professionals alike – thanks to the low cost and widespread availability with great community support. If you are able to read sound levels accurately using the PCB Artists decibel sensor module, you can easily
- read indoor noise levels at home
- detect a barking dog or loud sounds
- monitor occupational noise hazards
- keep track of industrial noise
- detect traffic jams or hold-ups
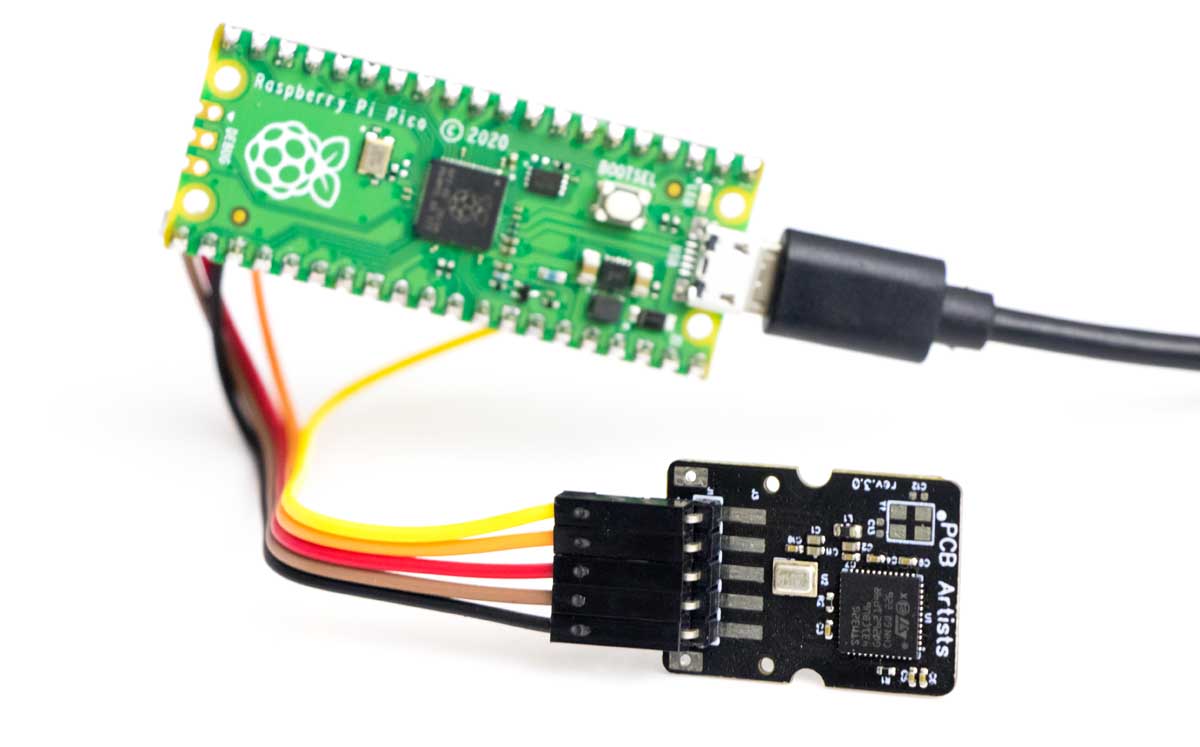
Connecting Pi Pico and Sound Level Sensor
It is very easy to connect the Pi Pico and sound level sensor. The sound meter module is a simple 3.3V I2C sensor with 7-bit address being 0x48.
To connect them, you need to connect the module to Pi Pico or any RP2040 board as follows:
- Sound meter module 3.3V to Pi Pico 3.3V Out
- Sound meter module SDA to Pi Pico GPIO 16
- Sound meter module SCL to Pi Pico GPIO 17
- Sound meter module GND to Pi Pico GND
The sound meter INT pin is optional and can be used as an interrupt source. For example, if you wanted to wake up the RP2040 only if the sound level goes outside a certain range, you can enable the INT pin of the module (see decibel meter programming reference for how to do that).
You can still connect other sensors to the same I2C pins and you can also change the SCL and SDA pin assignments in code for the Pi Pico.
Using MicroPython on Pi Pico to Read Decibel Sensor
By using MicroPython, a lightweight implementation of Python, you can quickly and easily write code to interface with the PCB Artists decibel sensor module. The MicroPython code shared here initializes the I2C port, assigns physical GPIO to SCL and SDA, and then attempts to read 0x0A register (decibel value) from the module.
Here are some steps you can refer to for running the MicroPython code on a Pi Pico:
- Make sure you understand the basics of how MicroPython works on the Pi Pico, how you can install the interpreter and get simple code fragments to work.
Luckily, the Raspberry Pi website shares a very helpful and detailed guide on how to set up and run MicroPython on the Pi Pico. - Copy and paste the Pi Pico MicroPython code shared below into Thonny. Save and run the code to see decibel readings in the log output window.
import machine
import utime
import ustruct
import sys
###############################################
# Constants
# I2C address
PCBARTISTS_DBM = 0x48
# Registers
I2C_REG_VERSION = 0x00
I2C_REG_ID3 = 0x01
I2C_REG_ID2 = 0x02
I2C_REG_ID1 = 0x03
I2C_REG_ID0 = 0x04
I2C_REG_SCRATCH = 0x05
I2C_REG_CONTROL = 0x06
I2C_REG_TAVG_HIGH = 0x07
I2C_REG_TAVG_LOW = 0x08
I2C_REG_RESET = 0x09
I2C_REG_DECIBEL = 0x0A
I2C_REG_MIN = 0x0B
I2C_REG_MAX = 0x0C
I2C_REG_THR_MIN = 0x0D
I2C_REG_THR_MAX = 0x0E
I2C_REG_HISTORY_0 = 0x14
I2C_REG_HISTORY_99 = 0x77
###############################################
# Settings
# Initialize I2C with pins
i2c = machine.I2C(0,
scl=machine.Pin(17),
sda=machine.Pin(16),
freq=100000)
###############################################
# Functions
def reg_write(i2c, addr, reg, data):
"""
Write bytes to the specified register.
"""
# Construct message
msg = bytearray()
msg.append(data)
# Write out message to register
i2c.writeto_mem(addr, reg, msg)
def reg_read(i2c, addr, reg, nbytes=1):
"""
Read byte(s) from specified register. If nbytes > 1, read from consecutive
registers.
"""
# Check to make sure caller is asking for 1 or more bytes
if nbytes < 1:
return bytearray()
# Request data from specified register(s) over I2C
data = i2c.readfrom_mem(addr, reg, nbytes)
return data
###############################################
# Main
# Read device ID to make sure that we can communicate with the ADXL343
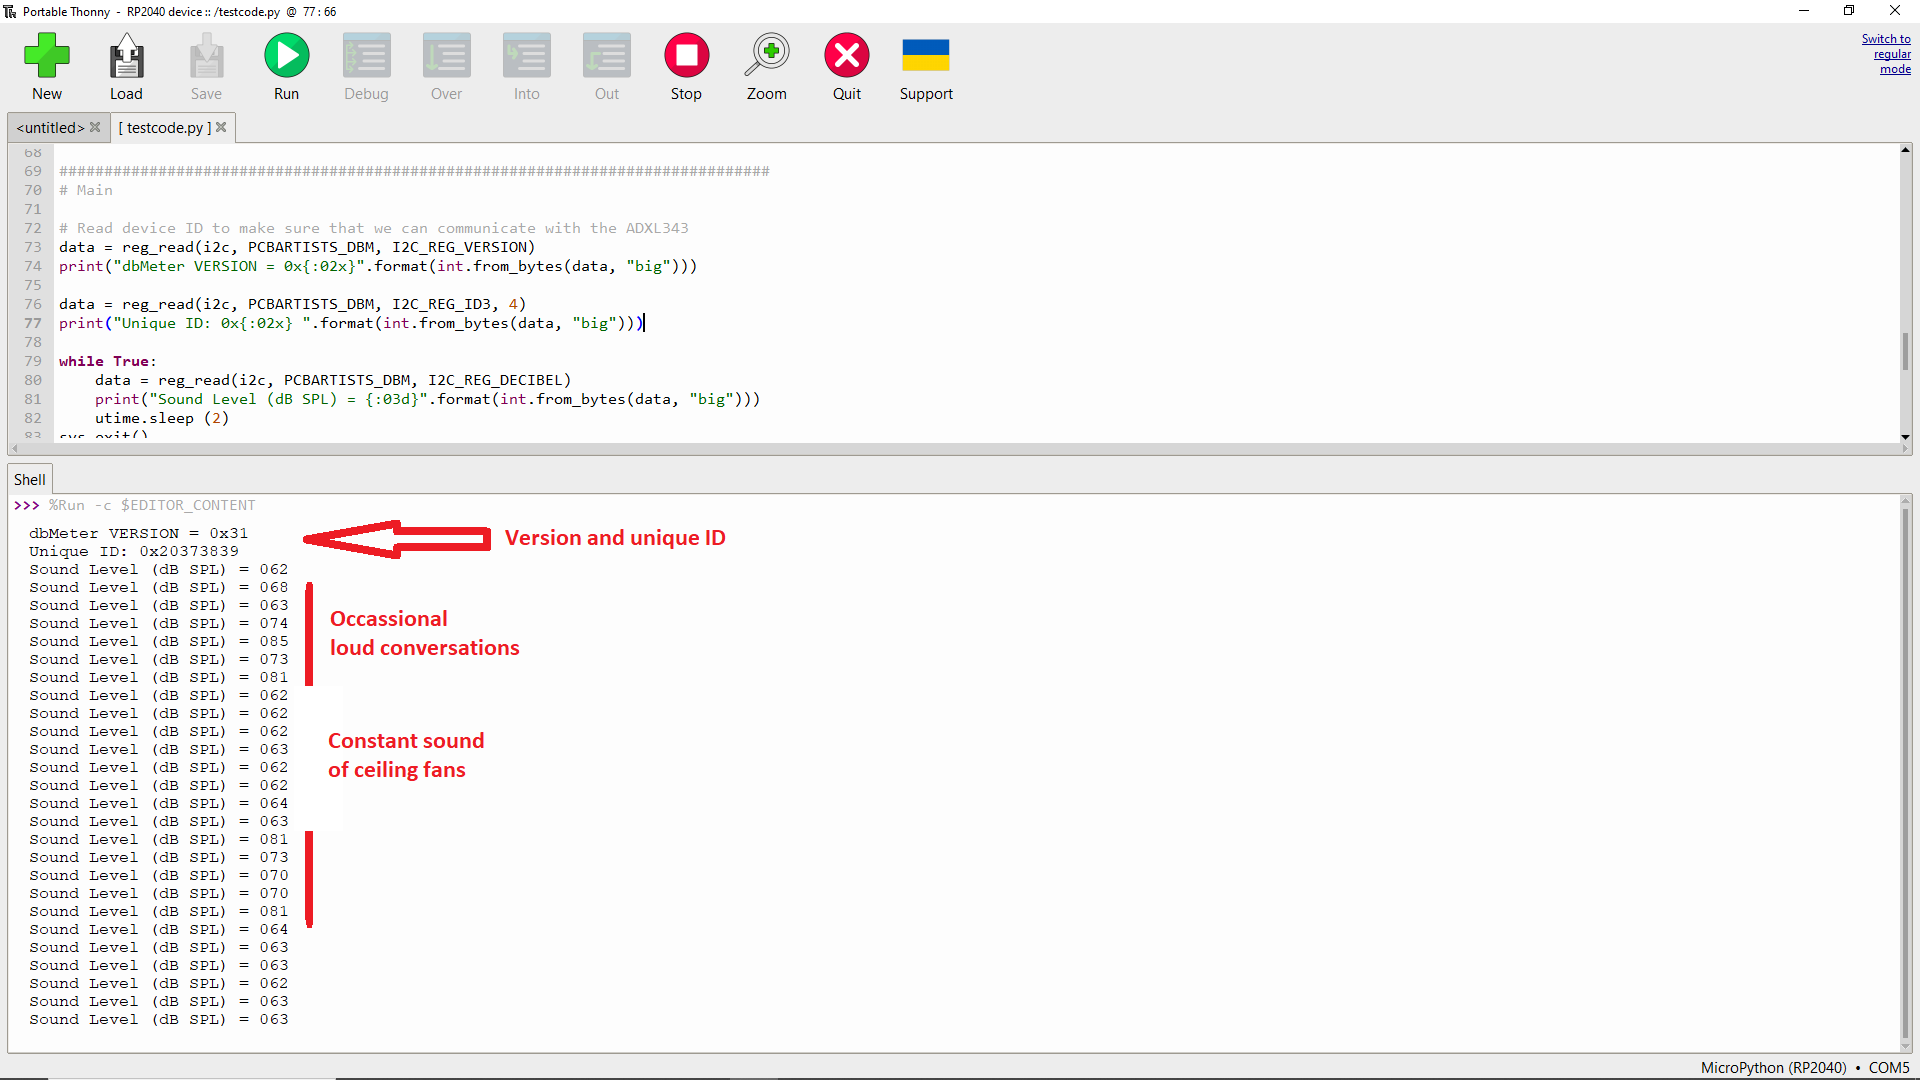
data = reg_read(i2c, PCBARTISTS_DBM, I2C_REG_VERSION)
print("dbMeter VERSION = 0x{:02x}".format(int.from_bytes(data, "big")))
data = reg_read(i2c, PCBARTISTS_DBM, I2C_REG_ID3, 4)
print("Unique ID: 0x{:02x} ".format(int.from_bytes(data, "big")))
while True:
data = reg_read(i2c, PCBARTISTS_DBM, I2C_REG_DECIBEL)
print("Sound Level (dB SPL) = {:03d}".format(int.from_bytes(data, "big")))
utime.sleep (2)
sys.exit()If you have connected everything correctly and the code executes successfully, you should see an output log like this.
Note that the above code is pretty much derived from this great DigiKey article on Pi Pico I2C and MicroPython. You can look at the article to gain a better understanding of I2C MicroPython code or find a parallel in C.
A Short Note on the Pi Pico MicroPython Code
The MicroPython code shared above may not be “complete”, but it will get you started with your Pi Pico sound level sensing project. All you need to do is read and write to registers according to the decibel sensor programming manual and you should be good to go.
- PCBARTISTS_DBM = 0x48 defines the I2C address of the decibel sensor module, it should not be changed unless you ordered a custom module with different I2C address
- I2C_REG_x are register addresses that you can look up in the programming manual for the sound level sensor
- i2c = machine.I2C() call initializes I2C0 peripheral of the Pi Pico or RP2040 and assigns SCL to GPIO 17 and SDA to GPIO 16. You can change these pins, but make sure you connect the decibel module accordingly!
We set the frequency to 100kHz initiall, the module has been tested to go up to 400 kHz though. - reg_write() function can be called to write a value to a certain register of the decibel sensor module.
- reg_read() will read the value of a register from the decibel sensor module.
- The main routine reads the version and 32-bit unique ID registers from the module and displays them. It then proceeds to enter an infinite loop that keeps readings the decibel readings and printing it out on the log terminal every 2 seconds.
Note that this is very basic demo code that assumes that you have connected the sensor properly to the correct GPIO. If something is wrong, the code will not run and throw errors.
Frequently Asked Questions (FAQs)
Yes, you can connect other 3.3V I2C sensors to the same I2C SCL and SDA pins as the PCB Artists sound level sensor module. Just make sure that you use a I2C speed which is compatible with all the sensors (usually 100 kHz).
The Pi Pico (RP2040) features a GPIO matrix that allows you to assign a number of GPIO pins to the I2C peripheral (with some restrictions). Therefore, you can flexibly use an available GPIO for SCL and SDA functions. See this Hackster article on Pi Pico I2C for more information.
The I2C address of the Sound Sensor Module is set to 0x48 by default. Only modules with different addresses can be used on the same I2C bus. You can contact us after a purchase if you need modules with different I2C addresses.
We do not offer a dedicated library to use the Decibel Sensor with Pi Pico because of how simple the module register structure is. You can read and write registers as required using the reg_read and reg_write routines included in sample code above.
You do not need to perform any additional calibration of the Sensor. We already calibrate it for +/- 2dB SPL accuracy at 94 dB @1kHz tone.
You can set the Tavg time to something like 100ms and read the decibel “max” values every second. Setting a lot Tavg value makes sure that short, loud sound events are captured. If you use a large Tavg, sudden loud sounds will be averaged out over Tavg.
The default Tavg is 1000ms, which strikes a balance.
Have Something to Say?
Feel free to ask away via the Live Chat, drop us a message using the Quick Contact form in the sidebar, or leave a comment below.
Change Log
- 21 May 2023
– Initial release