Making an ESP32 Bluetooth audio player with volume control is easier than you would think it is. Thanks to the dozens of examples that the Espressif ESP-ADF contains, you can set up the hardware and make it work as a Bluetooth speaker in less than 15 minutes.
Usually, you will need to use an audio development board to make an ESP32 Bluetooth audio player. But in this case we are using the PCB Artists ES8388 module to make the task easy. A bulky, dedicated ESP32 audio applications development board like the Lyra-T is not really necessary if you simply need basic audio playback and recording features.

ESP32 Bluetooth Audio Player Components
An ESP32 BT audio player will consist of two basic parts – the ESP32 module itself and an audio codec.
An audio DAC is good enough, but I used the PCB Artists ES8388 module because it is directly compatible with ESP-ADF examples. Not just that, the module gives you stellar audio quality. You will not be able to tell the difference between ESP32 playing audio via ES8388 module and a smartphone playing the same audio.
You can use any ES8388 based hardware to follow this example though, using our module is not necessary.
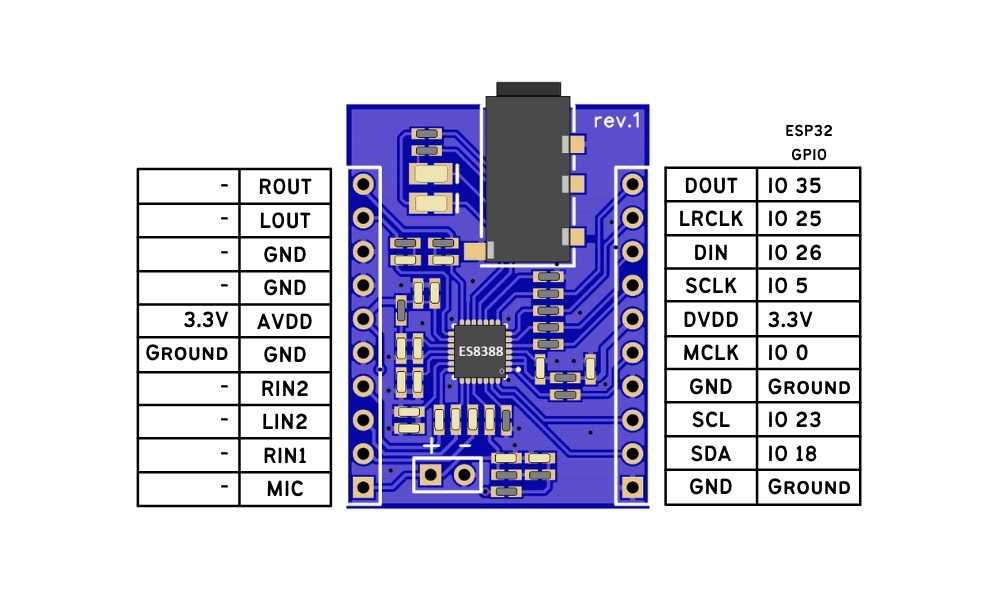
Connecting ESP32 and ES8388 Module
Any ESP32 breakout board, module or devkit that you use is good for use with the ES8388 module. Just ensure that the GPIOs listed below for connection to the ES8388 are available for use. All the GPIOs can be changed, except for GPIO 0 as MCLK.
However, for simplicity, we will use the connections shown below. These are default connections defined in ESP-ADF and make it easy to build the example without changing any code.
To change the GPIOs assigned, you will need to modify the ESP-ADF example’s board configuration. I will go through that process in a future article.
IO0 of the ESP32 is an important pin in all audio applications. This GPIO has the capability to put out master clock or MCLK signal generated using the ESP32 audio PLL (APLL). The APLL clock must be made available to the audio codec for proper audio playback. Some codecs like the SGTL5000 do not even respond to I2C communication unless MCLK is provided.
If you are new to audio codecs and the signal names and roles are confusing you, you can read more about interfacing the ES8388 audio codec with ESP32. The article contains details on what codec pins do what, and why you need them.
In some cases, for example in ESP32 ethernet applications, GPIO 0 may not be available for audio master clock output. The ES8388 module must then be configured as I2S master in PLL mode. ES8388 can derive its internal clocks from any clock source that is not a specified multiple of audio sample-rate and manage to run as usual without GPIO 0 APLL clock.
Set up ESP-ADF
You will need to set up ESP-ADF (and ESP-IDF as a part of the process) if you have not already. With ADF installed, you can simply compile the Bluetooth audio streaming example and flash it on to the ESP32 board that you are using.
To install the ESP-ADF and configure it, you can follow the ESP-ADF setup instructions.
For our build, we used ESP-IDF 4.0 installed first on a Windows machine and then linked the latest ESP-ADF clone to it.
Build the Bluetooth A2DP Sink Example
To play back audio as a Bluetooth audio player, the ESP32 must be configured as an audio sink. The ESP32 Bluetooth audio player must use the A2DP profile for this function. Control of the Bluetooth player is achieved over AVRCP profile. Control may include operations like setting audio playback volume.
You can read more about Bluetooth A2DP profile and AVRCP profiles on the Bluetooth website.
To build the example, you need to open the ESP32 A2DP audio sink stream example and run menuconfig on it first:
cd %ADF_PATH%\examples\player\pipeline_a2dp_sink_stream
idf.py menuconfig
Once you have access to the menuconfig, make sure that you go to menu item Audio HAL and set the Audio board as ESP32-LyraT V.4.3.
Selecting this HAL and using the ESP32 to ES8388 connections shown above makes your setup compatible with the Lyra-T, which makes it easy to run the example directly using our ES8388 module.

After saving the menuconfig settings, you can run the build process as usual. To flash, you can use the idf.py flash command after the build command.
idf.py build
idf.py flash -b 921600 monitor -p COMx
Connect to the ESP32 Bluetooth Audio Sink
Enjoy the ESP32 Bluetooth Audio Player!
The output audio quality is very clean if you power your ES8388 module from a LiPo cell or some other “clean” power source. When the ESP32 module is powered via a PC USB cable, there may be audible noise when playing back “very quiet” media at extremely high volume settings. However, we have ensured in our design that you are not penalized with noise just because you do not provide super clean AVDD power to the ES8388 module. The module can handle a fair amount of noise with its built-in analog power rail filtering.
You may connect the ES8388 codec module 3.5mm audiooutput jack to a PC speaker to make a complete Bluetooth speaker setup for yourself!
Feel free to ask away via the Quick Contact form in the sidebar, or leave a comment below.
Change Log
- Initial Release: 18 May 2021
- Minor Updates: 24 December 2022