This article will walk you through the process of putting together an accurate Arduino decibel meter using an Arduino Uno. Unlike all the other projects that use a simple electret microphone module to estimate audio levels, this one uses a true A-weighted decibel measurement module that produces true decibel readings comparable to a commercial Class 2 handheld sound level meter.
Our reference for this project was a Fluke 945 sound level meter and this solution produces results very similar to the Fluke.
- How this Arduino Decibel Meter is Better
- Displaying Decibel Values on a 7-Segment Display
- Connecting 7-Segment Display and Decibel Sensor with Arduino Uno
- Serial Terminal Log Output
- Arduino Decibel Meter Sketch
- Some Uses for Sound Level Monitoring with Arduino Uno
- Buy the Decibel Sound Sensor Module
- Change Log
How this Arduino Decibel Meter is Better
If you followed a simple approach of reading sound levels from a microphone module – you will most likely be reading peak or envelope values for the audio signal. While it can give you a reasonable estimate of the sound level in question, it is far from reliable.
Low power Arduino boards are very popular among hobbyists. Given the fact that many AVR based Arduino boards like an Arduino Uno do not have sufficient computing power to calculate decibel values in real time, we use a module we created specifically for sound measurement applications. All the Arduino Uno needs to do is read the decibel values over TwoWire or I2C.
The PCB Artists decibel meter module used in this tutorial adopts the proper approach to measuring noise level in decibels (that commercial sound meters follow):
- Sample audio at 16 kHz from built-in calibrated microphone
- Transform signals to frequency domain using FFT
- Compensate for microphone characteristics
- Add weighting coefficients and time averaging as per settings
The Arduino Uno can then read this decibel value without spending a lot of GPIOs or processing power on it… which allows you to focus on your application without worrying about the complexities of sound level measurement!
Displaying Decibel Values on a 7-Segment Display
A computer terminal is not always very useful for playing sound levels in practical environments. It is much more useful to be able to show the readings in real-time. Seven-segment LED displays are the lowest cost and best solution for this.
7-segment displays not only consume very little power, they are low-cost, easily available and glow brightly.
To use a 7-segment display with the Arduino Uno, you will need some arrangement to multiplex the LED segments and drive them without using too many GPIOs.
If you need to interface several 7-segment displays to your Arduino without using up all the GPIOs you have, the best solution out there is to use a MAX7219 based display module.
The MAX7219 uses only 3 Arduino GPIOs and lets the Arduino Uno command individual LEDs on the 7-segment displays. The MAX7219 takes care of time domain multiplexing needed to drive several 7-segment displays at once.

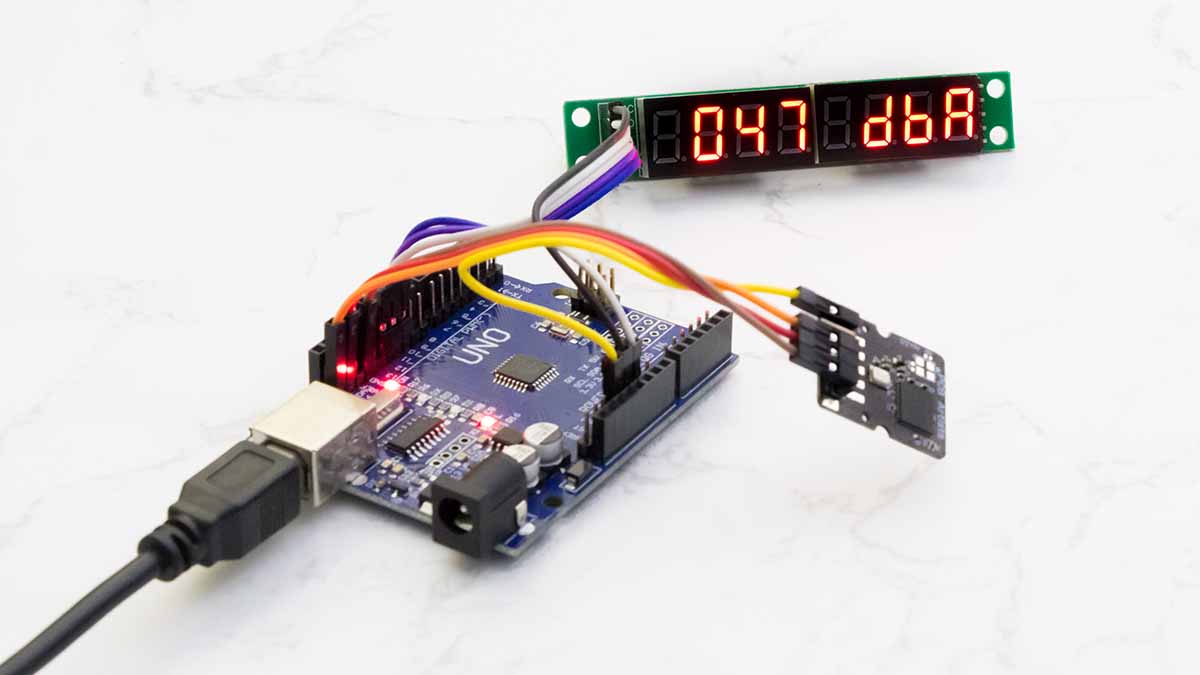
Connecting 7-Segment Display and Decibel Sensor with Arduino Uno
Here are some notes on connecting our sound sensor module with Arduino:
- Connect the 3.3V pin of the decibel meter to 3.3V output of Arduino Uno
- Connect the SCL and SDA pins of the decibel meter to D19 and D18 of the Arduino Uno, respectively
- GND of the sensor should connect to GND of the Arduino Uno
However, SCL and SDA pins of the sensor can be used with a 5V I2C system.
To connect the display with an Arduino Uno, you can connect
- D12 of Arduino Uno to DataIn of Display
- D11 of Arduino Uno to CLK of Display
- D10 of Arduino Uno to LOAD of Display
These pinouts are defined in the Arduino sketch when initializing the LedControl display driver object.
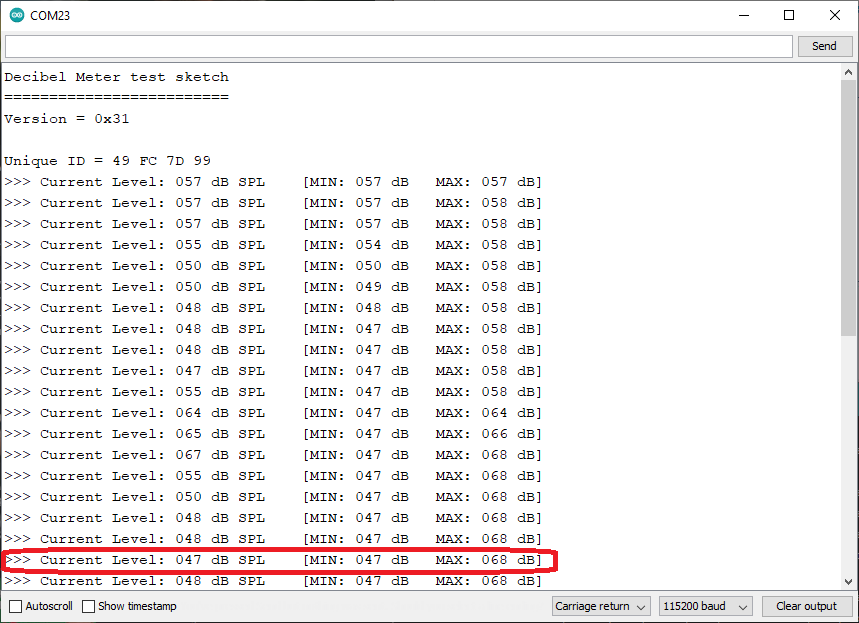
Serial Terminal Log Output
The Arduino sketch shared at the end of this article produces logs over the serial terminal to help debug and monitor the readings from the decibel sensor module. It will allow you to see how the minimum and maximum noise level recording works.
You can experiment by reading and writing various device registers present on the decibel meter module by referring to this programming guide for the decibel sensor module.
If your hardware is set up properly, the sketch below will print out the decibel meter’s version and unique ID as shown below.
Arduino Decibel Meter Sketch
Here is a sketch that you can run on an Arduino Uno to read decibel values and also track minimum and maximum decibel readings. The sketch displays the current decibel reading on the attached 7-segment display and also prints out the readings over the serial terminal.
The sketch is well-commented so you can easily understand how it is put together.
Before you run this sketch, you need to include the LedControl library to your project. You can visit the official page of the LedControl library to download the ZIP file and also view documentation related to the library functions and how to use them.
To add the downloaded LedControl library ZIP file to your Arduino project, simply go to Sketch > Include Library > Add .ZIP Library and point to the LedControl library ZIP file.
#include <stdio.h>
#include <string.h>
#include <Wire.h>
#include "LedControl.h"

/*
pin 12 is connected to the DataIn
pin 11 is connected to the CLK
pin 10 is connected to LOAD
*/
LedControl lc=LedControl(12,10,11,1);

// I2C address for the module
#define DBM_ADDR                0x48

// Device registers
#define   DBM_REG_VERSION       0x00
#define   DBM_REG_ID3           0x01
#define   DBM_REG_ID2           0x02
#define   DBM_REG_ID1           0x03
#define   DBM_REG_ID0           0x04
#define   DBM_REG_SCRATCH       0x05
#define   DBM_REG_CONTROL       0x06
#define   DBM_REG_TAVG_HIGH     0x07
#define   DBM_REG_TAVG_LOW      0x08
#define   DBM_REG_RESET         0x09
#define   DBM_REG_DECIBEL       0x0A
#define   DBM_REG_MIN           0x0B
#define   DBM_REG_MAX           0x0C
#define   DBM_REG_THR_MIN       0x0D
#define   DBM_REG_THR_MAX       0x0E
#define   DBM_REG_HISTORY_0     0x14
#define   DBM_REG_HISTORY_99    0x77

TwoWire dbmeter;
// Buffer for printing decibel values over UART
char buf[64];

// Function to read a register from decibel meter module
uint8_t dbmeter_readreg (TwoWire *dev, uint8_t regaddr)
{
  dev->beginTransmission (DBM_ADDR);
  dev->write (regaddr);
  dev->endTransmission();
  dev->requestFrom (DBM_ADDR, 1);
  delay (10);
  return dev->read();
}

// Function to write a register to decibel meter module
uint8_t dbmeter_writereg (TwoWire *dev, uint8_t regaddr, uint8_t regdata)
{
  dev->beginTransmission (DBM_ADDR);
  dev->write (regaddr);
  dev->write (regdata);
  dev->endTransmission();
  delay (10);
  return dbmeter_readreg (dev, regaddr);
}

void setup() {
  Serial.begin (115200);
  Serial.println ("Decibel Meter test sketch");
  Serial.println ("=========================");

  // Enable 7-segment display
  lc.shutdown(0,false);
  // Set brightness to 10 (range is 0-15)
  lc.setIntensity(0,10);
  // Clear the display
  lc.clearDisplay(0);
}

void loop() {
  // Initialize I2C at 10kHz
  dbmeter.begin (10000);

  // Read version register
  uint8_t version = dbmeter_readreg (&dbmeter, DBM_REG_VERSION);
  sprintf (buf, "Version = 0x%02X\r\n", version);
  Serial.println (buf);

  // Read ID registers
  uint8_t id[4];
  id[0] = dbmeter_readreg (&dbmeter, DBM_REG_ID3);
  id[1] = dbmeter_readreg (&dbmeter, DBM_REG_ID2);
  id[2] = dbmeter_readreg (&dbmeter, DBM_REG_ID1);
  id[3] = dbmeter_readreg (&dbmeter, DBM_REG_ID0);
  sprintf (buf, "Unique ID = %02X %02X %02X %02X",
            id[3], id[2], id[1], id[0]);
  Serial.println (buf);

  // Clear the MIN and MAX reading
  dbmeter_writereg (&dbmeter, DBM_REG_RESET, 0x02);

  // Variables to store current, min and max readings
  uint8_t db, dbmin, dbmax;

  while (1)
  {
    // Read decibel, min and max
    db = dbmeter_readreg (&dbmeter, DBM_REG_DECIBEL);
    if (db == 255)
      continue;   // module is not ready

    dbmin = dbmeter_readreg (&dbmeter, DBM_REG_MIN);
    dbmax = dbmeter_readreg (&dbmeter, DBM_REG_MAX);

    // Generate string and print values to terminal
    sprintf (buf, ">>> Current Level: %03d dB SPL\t", db);
    sprintf (buf, "%s [MIN: %03d dB\tMAX: %03d dB]", buf, dbmin, dbmax);
    Serial.println (buf);

    // Display decibel level on 7-segment display
    lc.clearDisplay(0);
    lc.setDigit(0, 6, db/100, false);
    lc.setDigit(0, 5, (db%100)/10, false);
    lc.setDigit(0, 4, (db%10), false);
    lc.setChar(0, 2, 'd', false);
    lc.setChar(0, 1, 'B', false);
    lc.setChar(0, 0, 'A', false);

    // Wait for 1 second before posting another reading
    delay (1000);
  }
}
Some Uses for Sound Level Monitoring with Arduino Uno
We often come across queries on how to build simple sound level sensors for various daily-use applications. The PCB Artists decibel sensor module makes these applications a breeze to implement. All you need to do is hook up the module to an Arduino, add a display device and there you go!
Here are some examples of what you could do with an Arduino decibel meter with 7-segment display.
- Monitor noise levels in hospitals
Hospitals have a lot of waiting areas in close proximity to patients. Sound level sensors mounted in those areas that display a live noise level reading against a recommended maximum level can be an engaging tool that keeps noise levels in check. - Keep office noise levels under control
Office spaces that deal with a lot of phone calls are often very loud and can lead to communication issues when trying to connect with clients. This Arduino decibel meter is a nice little addition there. - Track noise in libraries and classrooms
Keep an eye on classrooms and sections of a library when you are not around. A display mounted outside a sound-proof room can help you monitor noise levels easily without physically checking on the space. - Monitor noise around your home
Tired of something causing disturbance around the house? Track and log sound levels of pumps, heating systems, HVAC, etc and figure out how you can make things better. - Maintain safe sound levels in your garage
Do you have your own power tools and do you like building a bunch of hardware in your free time? If you are into woodworking or construction – this Arduino sound level meter can be a good addition to your workspace.
You can monitor sound levels and make sure you use protection when it gets too loud.
Buy the Decibel Sound Sensor Module
The sound sensor module is available to buy on our web store. You can find more information and example project links on the product page. We ship worldwide.
Change Log
- 16 July 2023
– Initial release