We recenty designed a custom i.MX6 Solo X based board for a client and wanted to build U-Boot for it to validate some peripherals. This article contains “notes” about building U-Boot for i.MX6 Solo X from sources.
You can follow these notes if you are trying to just build U-Boot from sources to validate your hardware, or just want to try out U-Boot in general.
Linux Host PC Configuration
- Oracle VirtualBox on top of Windows 10 host
- Ubuntu 14.04 LTS, 32-bit version
- VM was set up to have 6GB RAM and 50GB dynamic virtual disk for storage
Install Pre-Requisites to Build U-Boot
Assuming that you have updated your Ubuntu 14.04 system with the latest package updates, here are the components that you should install to be able to build U-Boot binaries from sources.
# Get updates
sudo apt-get update

# Install packages needed to build U-Boot for i.MX6 Solo X
sudo apt-get install gawk \
    wget git diffstat unzip \
    texinfo gcc-multilib \
    build-essential chrpath \
    socat libsdl1.2-dev xterm \
    picocom ncurses-dev lzop \
gcc-arm-linux-gnueabihfGet i.MX6 U-Boot Sources from Freescale Repository
Freescale maintains a GitHub repository with U-Boot sources. On that repository, you can find uBoot default configs that are helpful towards powering up custom boards. It may not be fully functional, but it is useful at times to just use those default config files for basic testing.
Here is how you can get Freescale U-Boot sources to your Linux PC desktop.
# Go to the desktop
cd ~/Desktop

# Clone the Freescale U-Boot repository
git clone https://github.com/Freescale/u-boot-fslc.git

# Switch to a branch that you want to use
cd u-boot-fslc
git checkout 2017.05+fslc
Build U-Boot from Sources for i.MX6
Building U-Boot from sources is easy, now that you have the repository cloned and tools ready.
In the following example, we are using the defconfig file for UDOO Neo, a board based on the i.MX6 Solo X chipset. You can use one that suits you.
ARCH=arm CROSS_COMPILE=arm-linux-gnueabihf- make udoo_neo_defconfig
ARCH=arm CROSS_COMPILE=arm-linux-gnueabihf- make
If these commands run properly, you will end up having the SPL and u-boot.imx files in the u-boot-fslc directory.
Flash SD Card with U-Boot Binary
Before you flash the SD card with U-Boot binaries, you need to format and clean up the card. Within Linux, you can do that using the fdisk command.
Before you format the SD card or do anything destructive, make sure that the SD card is what you are working on, and not another disk partition in your own system! To double check:
# List all disks to check
lsblk

# Check which one is the right disk
sudo fdisk /dev/sdb

# Use 'p' command for info on the selected disk
If things are good, you will be able to confirm from the disk size or partition structure that it is the SD card and not another system disk:

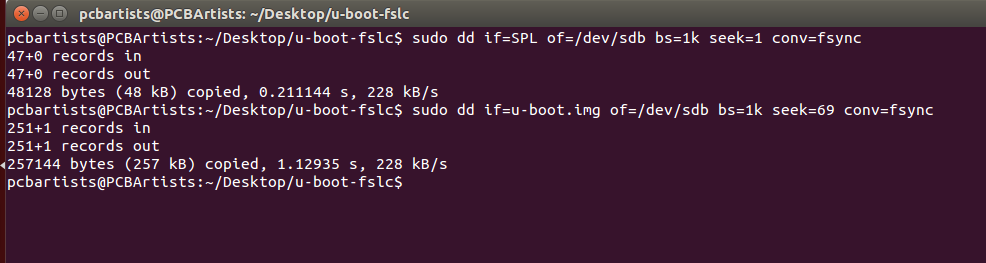
Now that the SD card is confirmed, you need to flash the SPL and U-Boot images to the SD card.
When the i.MX6 Solo X boots, the ROM firmware will look for a bootable image at address 0x400 in the SD card. Therefore, the SPL needs to be at that address, and the U-Boot should follow.
# Copy SPL to SD card
sudo if=SPL of=/dev/sdb bs=1k seek=1 conv=fsync

#Copy U-Boot.imx to SD card
sudo if=u-boot.img of=/dev/sdb bs=1k seek=1 conv=fsync
A mistake here can corrupt one of your system disks.
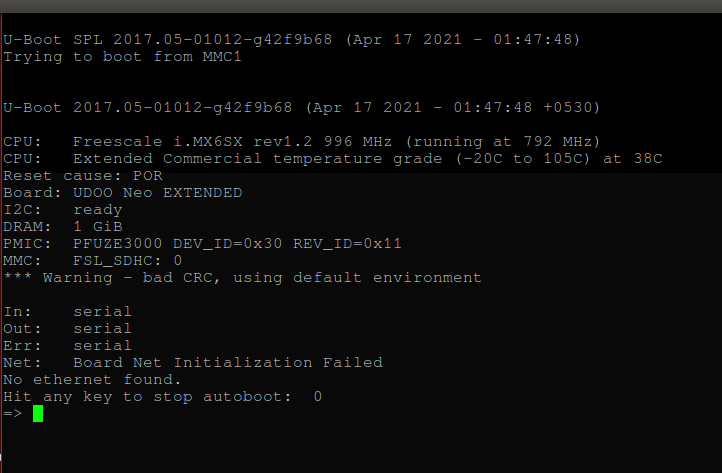
You should be able to eject the SD card now and insert it into your i.MX6 Solo X custom board. The custom board should successfully boot now and print logs out via the designated serial or alternative interface, depending on the board config that you picked and what it is programmed to do.
Power-up Custom i.MX6 Board with U-Boot
We booted up the i.MX6 Solo X board and it was able to run U-Boot successfully.
Please fill in the Subscription Form in the sidebar so we can keep you updated with our latest articles.
We only mail you less than 2 times a month.
Change Log
- Initial Release: 17 April 2021
References
- Reference 1: UDOO Neo, Building U-Boot
- Reference 2: Boot U-Boot from SD card
- Reference 3: i.MX 6Solo Applications Processor Reference Manual