The PCB Artists decibel meter module is a low power, tiny, and accurate sound level meter module that reads sound pressure level in dB SPL. You can connect the sensor to your Arduino, ESP32, Raspberry Pi or similar hardware. This guide aims to make the task of decibel meter module interfacing easy for you.
Module Pinout and Pin Descriptions
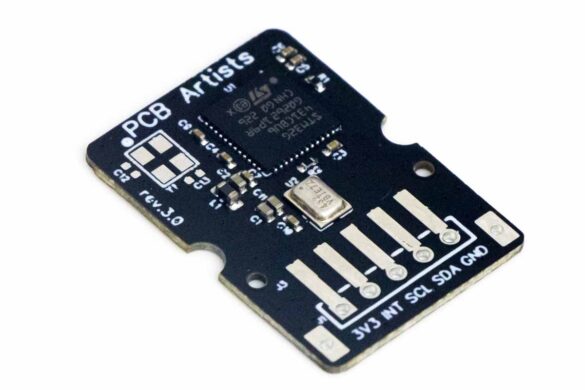
The sound level meter module has 5 pins.
The INT (interrupt) pin is optional and may be left open if unused in your application.
- 3V3
(Power supply input pin)
Source clean 3.3V regulated power supply to this pin. The module typically consumes 5mA at 3.3V. - INT
(Open-drain interrupt pin, active low)
The interrupt function is disabled by default. If enabled, INT pin goes low when an interrupt is pending. - SCL
(Open-drain I2C SCL pin)
Standard I2C bus SCL line, recommended pull-up is at least 10K. - SDA
(Open-drain I2C SDA pin)
Standard I2C bus SDA line, recommended pull-up is at least 10K - GND
(Ground pin)
Module ground, should be connected directly to the ground of system power source or battery if possible.
Module Connector Options
The sound level meter module can be configured to have 3 types of connectors.
- JST-XH (vertical)
If your application needs to have the decibel sensor module glued to an enclosure where the wires must be secured reliably, this option works best. - JST-XH (horizontal)
If your application needs the module to be stuck to an enclosure but has limited room above the module, use this connector configuration. - 0.1″ header
This is best suited for prototyping on breadboards and initial evaluation.
Decibel meter module interfacing with Raspberry Pi
The standard 40-pin Raspberry Pi GPIO header contains a 3.3V power output, ground, SCL and SDA. These 4 pins are all you need to use to connect the sound level meter module to a Raspberry Pi.
Here are details on decibel meter module interfacing with Raspberry Pi and sample code that you can use to test the sensor.
Frequently Asked Questions (FAQs)
In general, it is recommended to keep the I2C wires as short as possible. If the I2C cable length is longer than 30 cm, use high quality cables that are tied together. Pull-up resistance used should be 4.7K or lower and I2C clock speed should be reduced to less than 10kHz for long wires.
The PCB Artists decibel sensor is very immune to noise. However, it can still be susceptible to external RF interference and coupled mechanical vibrations.
Use a short, good quality cable to connect the decibel meter. Run the cable close to PCB ground plane where possible. Mount the module in a way where vibrations from fans and enclosure cannot directly couple to the sensor.
Yes, you can use a dedicated 3.3V power supply for the decibel sensor. Make sure the ground connection is common for the power supply, decibel sensor and Arduino/host PCB.
Use a star ground topology and avoid forming loops.
Yes, you can use 1.8V logic systems with the decibel meter but only if you power the decibel module using a 1.8V power source.
Yes, you can use multiple decibel sensor modules on one I2C bus by using modules with different I2C addresses. Contact us after placing an order.
Have Something to Say?
Feel free to ask away via the Live Chat, drop us a message using the Quick Contact form in the sidebar, or leave a comment below.
Change Log
- 5 May 2023
– Initial release
1 comment
Hi, I have two of these on order and am now designing 3D printed cases for the project. Please can you show mechanical dimension diagrams in this section (including size and position of the cut-outs in the sides of the device) so users can accurately design mountings for the device. Thank you :-)