This article will walk you through the process of setting up ESP-IDF Windows development environment and tools (based on CMake). Once completed, this setup will let you build ESP-IDF based programs for the ESP32.
To the credit of Espressif Systems, they have provided a simple executable setup program that seems to work well. In most cases, we noticed that the setup can configure your PC for compiling ESP32 ESP-IDF programs. Also, the CMake based environment builds programs MUCH faster on Windows PC than the MSYS32 version used to.
Here is how you can set up ESP32 Windows Cmake based development environment.
Our virtual PC configuration
We used a Windows virtual machine to set this development environment up. It could be preferable to do that rather than using your main work PC for a variety of reasons. If you have previous ESP32 toolchain installations or other conflicting system path variables registered, the new installation might mess it up. A VM with snapshots enabled is your best way forward in case you are not experienced in dealing with toolchain setup.
Here is some information on our virtual machine setup:
- Based on Oracle VirtualBox 5.1.26
- Windows 10 Single Language, 64-bit (you could use Windows 10 Pro as well)
- 2GB DDR4 RAM
- 4 CPU cores with 100% execution cap
- 256 MB video memory
- Dynamic virtual disk file
- Network adapter enabled and attached to NAT
It is highly recommended that you turn off updates on the Windows VM as soon as you install it. Updates will increase your installation size and not be of much use if you only intend to use the VM for ESP-IDF based development.
Download Windows ESP32 Cmake environment installer
Start by downloading the ESP32 IDF Tools Setup EXE (version 2.3) into your VM. You may also download version 2.3.
We believe that version 2.3 is very similar to 2.2 with some minor fixes. Version 2.2 has worked just fine for us so far.
Install ESP32 IDF Tools using installer
Launch the downloaded setup file. Make sure you are connected to the internet as the installer will need to download a few things. The download size (including Python, ESP-IDF and Git for Windows) will be around 500 MB in size.
- If asked, choose an existing installation of Python version 2.7. Otherwise you may choose to let the installer install Python 2.7 or later.
- If asked, pick an existing Git installation or let the installer download and install a version of Git.
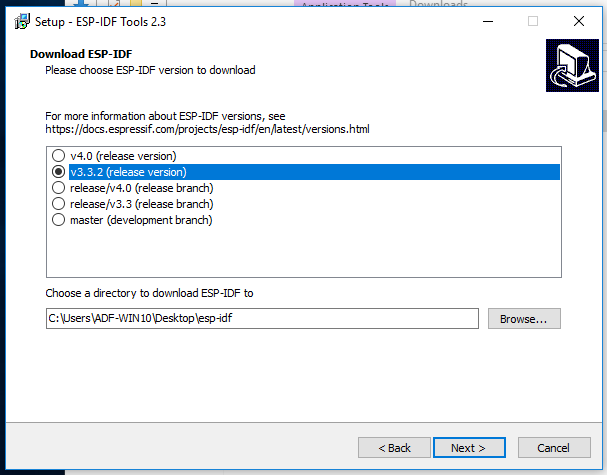
- Choose to download ESP-IDF. Do not pick an existing IDF directory if this is your first installation. Choosing an existing IDF directory might involve additional steps that are not covered in this article.
- Pick a version of IDF to download. When we develop firmware for you, we tell you which version of IDF you should download. Pick a version and proceed.
- Choose an install directory. Desktop should be fine if you are working on a VM.
It is important to note that the ESP-IDF installation path you choose should NOT have spaces in it.
i.e. C:\esp folder\esp-idf is not valid because there is a space in the path.

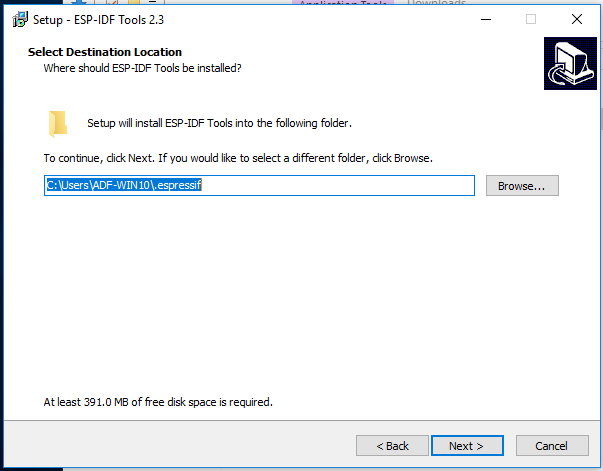
- Select a folder to install the toolchain and associated programs that help you build ESP-IDF sources.
It is highly recommended to just let this path be the default path. If you choose a different path or overwrite previous partial installations of the ESP32 toolchain, wrong tools may get invoked later and additional steps may be needed to fix it.

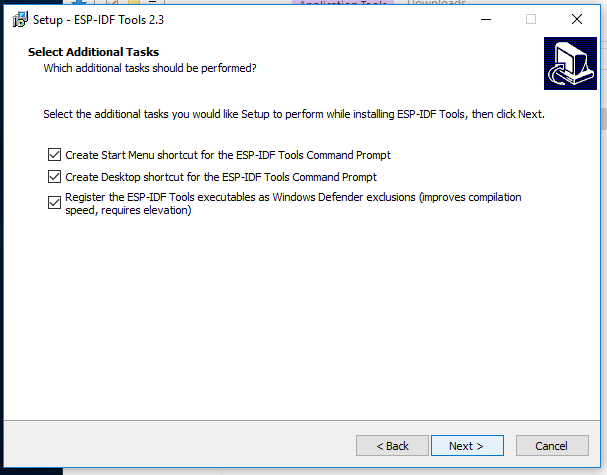
- Next, make sure you select creation of shortcuts. This shortcut will be very important for launching the ESP-IDF tools command prompt terminal later. If you choose not to create the shortcut, you will have to go through manual steps for every terminal window that accesses IDF tools.
- You may check or uncheck adding Windows Defender exclusions. We have noticed that it does not usually work and Windows Defender does slow down the building process. It is a good idea to temporarily turn off real-time protection in Windows Defender to compile programs fast.
Note that CMake based build system is incremental in nature, i.e. it only compiles files that changed and builds the project after a first full build. So once you build a project, subsequent builds are much faster.

- Finish the installation and you should be good to go!
Next steps
Next, we recommend the following:
- Compile an example to test your setup
- Go back to Client Corner to see what’s next
In trouble?
If you faced some issue with the above steps and need assistance setting up the ESP32 ESP-IDF development environment on Windows, please reach out to your PCB Artists contact person.